
Into The Hive classes and squad passives
Last updated:
Choose a class that supports your weapons, movement and utility equipment. Your class determines both your passive bonuses and your ultimate.
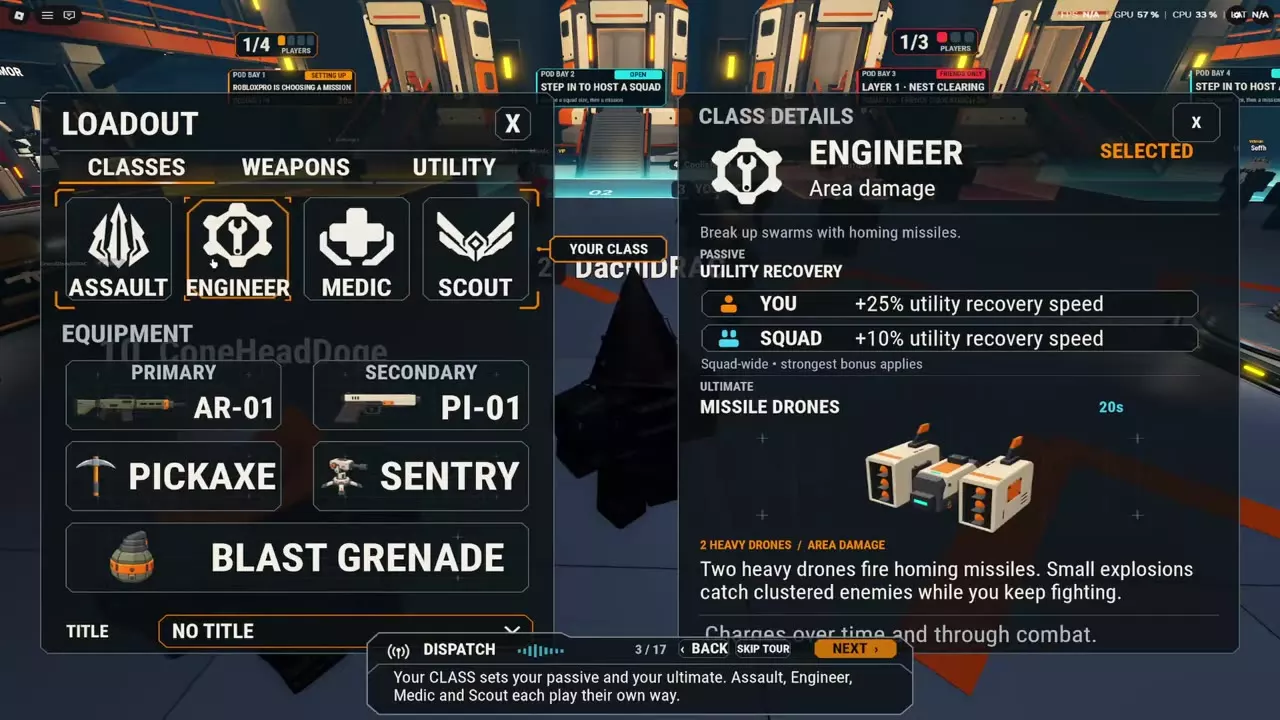
Open Loadout → Classes in the lobby. Choose Assault for faster reload and weapon recovery, Scout for sprint speed and piercing attacks, or Engineer for faster utility recovery and explosive attacks. Matching squad passives do not stack; only the strongest bonus of the same type applies.
Class roles
Assault supports sustained weapon damage, Scout combines mobility with piercing attacks, and Engineer combines area damage with faster utility recovery. Choose around the part of your loadout you rely on most: guns, movement or utility equipment.
The Classes menu also includes Medic.
Class directory
Compare each class's role, passive and ultimate. Expand a class to read its personal bonus, squad bonus and associated ability.
Compare class roles, passive types and ultimates.
3 objects
|
|
Sustained damage | Weapon Recovery | Blade Drones |
|---|---|---|---|
|
A class focused on sustained damage. Its Weapon Recovery passive improves reload and recovery speed, and its ultimate deploys autonomous blades.
TipsChoose Assault when reload and recovery speed support your weapon-focused playstyle. Continue firing while Blade Drones attack. |
|||
|
|
Mobility and piercing | Sprint Speed | Laser Drones |
|
A class focused on mobility and piercing attacks. Its Sprint Speed passive increases sprint speed, and its ultimate combines piercing lasers with temporary Air Walk.
TipsChoose Scout for faster sprinting, piercing attacks and temporary Air Walk. |
|||
|
|
Area damage | Utility Recovery | Missile Drones |
|
A class focused on area damage and utility recovery. Its Utility Recovery passive improves utility recovery speed, and its ultimate deploys homing-missile drones.
TipsChoose Engineer when utility recovery and explosive attacks against clustered enemies are central to your loadout. |
|||
Choose and change your class
- In the lobby, open LOADOUT.
- Select the CLASSES tab.
- Choose a class after comparing its personal passive, squad passive and ultimate.
Your selected class supplies your passive bonuses and class ultimate.
- Choose Assault for sustained gunfire. Faster reload and recovery speed support a weapon-focused loadout. Blade Drones attack autonomously while you keep fighting, adding pressure against nearby enemies or a single target.
- Choose Scout for movement and enemies lined up together. Faster sprinting supports repositioning, while Laser Drones pierce enemies in a line. Their foot pads provide temporary Air Walk while you shoot; jumping enemies can still reach you.
- Choose Engineer when utility equipment is central to your loadout. Faster utility recovery supports that equipment, while Missile Drones fire homing missiles with small-area explosions against clustered enemies.
Squad passive stacking
Only the strongest squad-wide bonus of the same type applies. Multiple players using the same class do not add their matching squad bonuses together. Two Assault players, for example, do not turn the 10% squad Weapon Recovery bonus into 20%.
The personal and squad values apply to these effects:
- Assault — Weapon Recovery: +25% personal reload and recovery speed; +10% squad reload and recovery speed.
- Scout — Sprint Speed: +15% personal sprint speed; +6% squad sprint speed.
- Engineer — Utility Recovery: +25% personal utility recovery speed; +10% squad utility recovery speed.
These are separate personal and squad values, not an additive total of 35% for Assault or Engineer, or 21% for Scout. When choosing a class for squad support, favor a useful passive type the team lacks instead of expecting another copy of the same squad bonus to increase it.
Ultimates and loadouts
- Drone ultimates and Air Walk explains Blade Drones, Laser Drones and Missile Drones, including charging, activation and airborne shooting.
- Into The Hive beginner guide combines your class choice with starting equipment and early upgrades.
- Boss loadouts pairs class passives with weapons, support equipment and armor for boss encounters.